

How to Sysprep a VirtualBox/VMWare install of Windows 8 and Capture it with Imagex to a new install.wim file so that you can use WinReducer to slim it down.
The purpose of this is that you can reuse the same image over and over again, with all the latest windows updates and your own specific apps installed.
Note: there is an issue with anti-virus programs and Adobe software and Sysprep, so you cannot install an antivirus. I don’t know of any way around that. Disabling their services doesn’t work. Maybe someone can find that out for me
Software you need to download (in order of usage):
1. Virtualisation software such as VirtualBox or VMWare
2. WinReducer for Windows 8
Here are the main steps that we will perform:
1. Install Windows on Virtual Machine
2. Attach VHD to windows
2.1 VirtualBox
2.2 VmWare
3. Capture reference image with DISM
4. Create Unattend.xml file
5. Create SetupComplete.cmd file
6. Sysprep the Image
7. Create install.wim with Imagex
8. Pre-installation step
9. Restoring the Reference image to our VHD
1. Install Windows on Virtual Machine
Install VirtualBox/VMWare and create a new virtual hard drive (must be of type .VHD, as that is the Microsoft standard).
Install Windows 8 to your new virtual hard drive, with your user profile, and install all the apps you use (except AV software and Adobe products) and install all the latest Windows updates.
We will be configuring a customized user profile. Any Sysprep articles you would read recommend customizing the “Administrator” profile but I prefer not to do it that way. We want to have all our apps and settings and drivers, etc installed, so that after reducing we don’t have to reinstall them.
Once you have installed all the apps and updates, you now need to take a pre-sysprep snapshot.
To be able to continually use the same reference image for using Sysprep, it is best to take a snapshot of your virtual install with DISM before running Sysprep, and then restoring from that snapshot after.
2. Attach VHD to windows
2.1 VirtualBox
We need to fire up the Disk Management tool in Windows 8. Type diskmgmt.msc in the run box (Windows key + R).
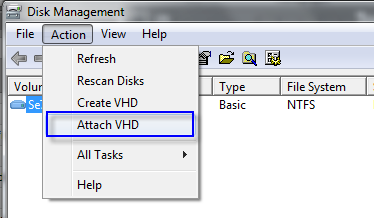
Browse to the .vhd file you created earlier that you installed Windows 8 to. Windows will now attach the vhd file as a new hard drive to Windows Explorer.
2.2 VmWare
VmWare cannot be directly mounted in Windows. Instead we need to use other software.
Passmark OSFMount is free software that will allow you to do that.
See more info in this post here.
3. Capture reference image with DISM
Open the command prompt as an Administrator (Windows key + X).
Enter the following command:
In the above command:
X:\Reference.Image is the directory path to where the generated install.wim will be saved
Y:\ is the source drive. We want to capture the entire drive that we added with disk management. This is the bigger of the two drives added. You can ignore the smaller 100MB drive.
We now have an install.wim we can restore from using DISM.
4. Create Unattend.xml file
Before we sysprep, we need to have an XML file labelled Unattend.xml in the same directory as Sysprep.
You can use a copy of the Autounattend.xml file that you may have created already with WinReducer. Next you need to make a few modifications.
In section <settings pass="specialize"> you need to add the following:
In section <settings pass="generalize"> you need to add the following:
You may or may not have a generalize pass or specialize pass already in your Autounattend.xml file.
Notes
Rename Autounattend.xml to Unattend.xml and copy it to the Sysprep directory (C:\Windws\System32\Sysprep).
5. Create SetupComplete.cmd file
Next make a batch file called SetupComplete.cmd, using Notepad. Make sure to save as “All files”. In SetupComplete.cmd paste the following lines:
del /Q /F c:\windows\system32\sysprep\Unattend.xml
del /Q /F c:\windows\panther\Unattend.xml
echo Sysprep Completed %date%>c:\ImageLog.txt
cscript //b c:\windows\system32\slmgr.vbs /ipk XXXXX-XXXXX-XXXXX-XXXXX-XXXXX
cscript //b C:\windows\system32\slmgr.vbs –ato
You will need to change the X's above with your Windows 8 product key. Once you have that saved in SetupComplete.cmd, on the machine you want to image create a folder called Scripts in C:\Windows\Setup and drop SetupComplete.cmd in there. The reason is because after Sysprep does its thing it runs any script in the folder. SetupComplete.cmd cleans up our XML answer file with sensitive passwords, creates a log on the root of C:\ called ImageLog.txt then inserts our Windows 8 key.
6. Sysprep the Image
Open the command prompt as an Administrator (Windows key + X) and navigate to C:\Windows\System32\Sysprep and run the following command:
/generalize -> this generalizes the installation so it can be reinstalled.
/oobe -> Used to prepare the computer for end-user. The user will be prompted with the Windows Welcome screen, etc.
/shutdown -> powers off the VM
7. Capture Sysprepped image with DISM
Re-attach the VHD as described in step 2.
Open the command prompt as an Administrator (Windows key + X).
Enter the following command:
In the above command:
X:\Sysprep.Captured is the directory path to where the generated install.wim will be saved
Y:\ is the source drive. We want to capture the entire drive that we added with disk management. This is the bigger of the two drives added. You can ignore the smaller 100MB drive.
I then copy the captured install.wim into the folder of my Windows 8 DVD and replace the original install.wim.
Next fire up WinReducer and do your thing.
8. Pre-installation step
Finally, before you deploy the installation, i.e. before you create the ISO, you need to reset SkipRearm. To do this, add the following to your Autounattend.xml file created by WinReducer8, in the root of the DVD. This is the same Autounattend.xml used at start of step 1..:
Now you can create the ISO with WinReducer.
9. Restoring the Reference image to our VHD
Using DISM we can restore the install.wim created in step 3.
Open the command prompt as an Administrator (Windows key + X).
Enter the following command:
In the above command:
X:\Reference.Image is the directory path to where the generated install.wim will be restored from
Y:\ is the destination drive (the VHD which we have attached in Windows).
End..
This is a basic guide Sysprepping, so if people have more questions, I can update it...
References:
None of this I wrote myself. What I did do was read a LOT of web-links to gather all this info into one (relatively) easy to use guide.
http://www.christowles.com/2010/11/windows-7-and-windows-server-2008.html
http://www.bauer-power.net/2011/02/how-to-sysprep-windows-7-on-easy.html#.UJPRksWHKSo
http://fogproject.org/forum/threads/help-sudden-sysprep-skip-rearm-confusion.4101/
Microsoft Tech Help
The purpose of this is that you can reuse the same image over and over again, with all the latest windows updates and your own specific apps installed.
Note: there is an issue with anti-virus programs and Adobe software and Sysprep, so you cannot install an antivirus. I don’t know of any way around that. Disabling their services doesn’t work. Maybe someone can find that out for me
Software you need to download (in order of usage):
1. Virtualisation software such as VirtualBox or VMWare
2. WinReducer for Windows 8
Here are the main steps that we will perform:
1. Install Windows on Virtual Machine
2. Attach VHD to windows
2.1 VirtualBox
2.2 VmWare
3. Capture reference image with DISM
4. Create Unattend.xml file
5. Create SetupComplete.cmd file
6. Sysprep the Image
7. Create install.wim with Imagex
8. Pre-installation step
9. Restoring the Reference image to our VHD
1. Install Windows on Virtual Machine
Install VirtualBox/VMWare and create a new virtual hard drive (must be of type .VHD, as that is the Microsoft standard).
Install Windows 8 to your new virtual hard drive, with your user profile, and install all the apps you use (except AV software and Adobe products) and install all the latest Windows updates.
We will be configuring a customized user profile. Any Sysprep articles you would read recommend customizing the “Administrator” profile but I prefer not to do it that way. We want to have all our apps and settings and drivers, etc installed, so that after reducing we don’t have to reinstall them.
Once you have installed all the apps and updates, you now need to take a pre-sysprep snapshot.
- If you are using Sysprep on a VM, you will have to install drivers via WinReducer.
- You can also use sysprep on your physical installation, but there are extra steps involved. If people are interested I can add that
To be able to continually use the same reference image for using Sysprep, it is best to take a snapshot of your virtual install with DISM before running Sysprep, and then restoring from that snapshot after.
2. Attach VHD to windows
2.1 VirtualBox
We need to fire up the Disk Management tool in Windows 8. Type diskmgmt.msc in the run box (Windows key + R).
Browse to the .vhd file you created earlier that you installed Windows 8 to. Windows will now attach the vhd file as a new hard drive to Windows Explorer.
2.2 VmWare
VmWare cannot be directly mounted in Windows. Instead we need to use other software.
Passmark OSFMount is free software that will allow you to do that.
See more info in this post here.
3. Capture reference image with DISM
Open the command prompt as an Administrator (Windows key + X).
Enter the following command:
Code:
dism /Capture-Image /Compress:max /ImageFile:X:\Reference.Image\install.wim /CaptureDir:Y:\ /Name:"Windows 8 Pro"In the above command:
X:\Reference.Image is the directory path to where the generated install.wim will be saved
Y:\ is the source drive. We want to capture the entire drive that we added with disk management. This is the bigger of the two drives added. You can ignore the smaller 100MB drive.
We now have an install.wim we can restore from using DISM.
4. Create Unattend.xml file
Before we sysprep, we need to have an XML file labelled Unattend.xml in the same directory as Sysprep.
You can use a copy of the Autounattend.xml file that you may have created already with WinReducer. Next you need to make a few modifications.
In section <settings pass="specialize"> you need to add the following:
Code:
    <settings pass="specialize">
<component name="Microsoft-Windows-Shell-Setup" processorArchitecture="amd64" publicKeyToken="31bf3856ad364e35" language="neutral" versionScope="NonSxS" xmlns:wcm="http://schemas.microsoft.com/WMIConfig/2002/State" xmlns:xsi="http://www.w3.org/2001/XMLSchema-instance">
            <CopyProfile>true</CopyProfile>
            <DoNotCleanTaskBar>true</DoNotCleanTaskBar>
        </component>
    </settings>
In section <settings pass="generalize"> you need to add the following:
Code:
    <settings pass="generalize">
        <component name="Microsoft-Windows-PnpSysprep" processorArchitecture="amd64" publicKeyToken="31bf3856ad364e35" language="neutral" versionScope="NonSxS" xmlns:wcm="http://schemas.microsoft.com/WMIConfig/2002/State" xmlns:xsi="http://www.w3.org/2001/XMLSchema-instance">
            <PersistAllDeviceInstalls>true</PersistAllDeviceInstalls>
        </component>
        <component name="Microsoft-Windows-Security-SPP" processorArchitecture="amd64" publicKeyToken="31bf3856ad364e35" language="neutral" versionScope="nonSxS" xmlns:wcm="http://schemas.microsoft.com/WMIConfig/2002/State" xmlns:xsi="http://www.w3.org/2001/XMLSchema-instance">
            <SkipRearm>1</SkipRearm>
        </component>
   </settings>
You may or may not have a generalize pass or specialize pass already in your Autounattend.xml file.
Notes
- Each <settings pass=********> block needs to end with </settings>
Each <component name=********> block needs to end with </component>
<settings pass=********> is superior to <component name =********>
There can be multiple items in <component name=********>
There can be multiple components in <settings pass=********>
- You need SkipRearm to avoid activation issues. This is really important, because Microsoft only allow you to Sysprep an image 3 times without this settting, and its a pain in the a$$ to fix after you have sysprepped 3 times without the SkipRearm setting
- If your system is 32-bit (x86) change processorArchitecture="amd64" to processorArchitecture="x86"
Rename Autounattend.xml to Unattend.xml and copy it to the Sysprep directory (C:\Windws\System32\Sysprep).
5. Create SetupComplete.cmd file
Next make a batch file called SetupComplete.cmd, using Notepad. Make sure to save as “All files”. In SetupComplete.cmd paste the following lines:
del /Q /F c:\windows\system32\sysprep\Unattend.xml
del /Q /F c:\windows\panther\Unattend.xml
echo Sysprep Completed %date%>c:\ImageLog.txt
cscript //b c:\windows\system32\slmgr.vbs /ipk XXXXX-XXXXX-XXXXX-XXXXX-XXXXX
cscript //b C:\windows\system32\slmgr.vbs –ato
You will need to change the X's above with your Windows 8 product key. Once you have that saved in SetupComplete.cmd, on the machine you want to image create a folder called Scripts in C:\Windows\Setup and drop SetupComplete.cmd in there. The reason is because after Sysprep does its thing it runs any script in the folder. SetupComplete.cmd cleans up our XML answer file with sensitive passwords, creates a log on the root of C:\ called ImageLog.txt then inserts our Windows 8 key.
6. Sysprep the Image
Open the command prompt as an Administrator (Windows key + X) and navigate to C:\Windows\System32\Sysprep and run the following command:
Code:
sysprep /generalize /oobe /shutdown /unattend:unattend.xml/generalize -> this generalizes the installation so it can be reinstalled.
/oobe -> Used to prepare the computer for end-user. The user will be prompted with the Windows Welcome screen, etc.
/shutdown -> powers off the VM
7. Capture Sysprepped image with DISM
Re-attach the VHD as described in step 2.
Open the command prompt as an Administrator (Windows key + X).
Enter the following command:
Code:
dism /Capture-Image /Compress:max /ImageFile:X:\Sysprep.Captured\install.wim /CaptureDir:Y:\ /Name:"Windows 8 Pro"In the above command:
X:\Sysprep.Captured is the directory path to where the generated install.wim will be saved
Y:\ is the source drive. We want to capture the entire drive that we added with disk management. This is the bigger of the two drives added. You can ignore the smaller 100MB drive.
I then copy the captured install.wim into the folder of my Windows 8 DVD and replace the original install.wim.
Next fire up WinReducer and do your thing.
8. Pre-installation step
Finally, before you deploy the installation, i.e. before you create the ISO, you need to reset SkipRearm. To do this, add the following to your Autounattend.xml file created by WinReducer8, in the root of the DVD. This is the same Autounattend.xml used at start of step 1..:
Code:
    <settings pass="generalize">
         <component name="Microsoft-Windows-Security-SPP" processorArchitecture="amd64" publicKeyToken="31bf3856ad364e35" language="neutral" versionScope="nonSxS" xmlns:wcm="http://schemas.microsoft.com/WMIConfig/2002/State" xmlns:xsi="http://www.w3.org/2001/XMLSchema-instance">
            <SkipRearm>0</SkipRearm>
        </component>
   </settings>
Now you can create the ISO with WinReducer.
9. Restoring the Reference image to our VHD
Using DISM we can restore the install.wim created in step 3.
Open the command prompt as an Administrator (Windows key + X).
Enter the following command:
Code:
dism /Apply-Image /ImageFile:X:\Reference.Image\install.wim /Index:1 /ApplyDir:Y:\In the above command:
X:\Reference.Image is the directory path to where the generated install.wim will be restored from
Y:\ is the destination drive (the VHD which we have attached in Windows).
End..
This is a basic guide Sysprepping, so if people have more questions, I can update it...
References:
None of this I wrote myself. What I did do was read a LOT of web-links to gather all this info into one (relatively) easy to use guide.
http://www.christowles.com/2010/11/windows-7-and-windows-server-2008.html
http://www.bauer-power.net/2011/02/how-to-sysprep-windows-7-on-easy.html#.UJPRksWHKSo
http://fogproject.org/forum/threads/help-sudden-sysprep-skip-rearm-confusion.4101/
Microsoft Tech Help


