

Hi All.
So, a little while ago I wrote a step by step Sysprep tutorial on how to customize your installation of Windows and use that as a base for slimming with Winreducer.
I showed you how to use Sysprep and all the steps you would need to do to perform this successfully...
Following a little discussion with inallsorts I decided to find out if it was possible to skip the Sysprep process entirely. And the answer seems to be, YES!!
There are some points to note though:
1. I have not installed this on a physical machine yet (but dont foreesee any issues)
2. If you are deploying to a number of different PC's, then you MUST use Sysprep method
So, if you are like me, and just want to customise Windows for personal use, then this is the guide for you
The purpose of this is that you can reuse the same image over and over again, with all the latest windows updates and your own specific apps installed.
Note: I am not sure yet if the same issues with an anti-virus programs and Adobe software arise with this method as they do with Sysprep, so I/you will need to test that further.
I have no issues with preinstalling Anti-virus if I do not use Sysprep. So its just a conflict with Sysprep
Software you need to download (in order of usage):
1. Virtualisation software such as VirtualBox or VMWare
2. WinReducer for Windows 8/8.1
Here are the main steps that we will perform:
1. Install Windows on Virtual Machine
2. Attach VHD to windows
2.1 VirtualBox
2.2 VmWare
3. Capture image with DISM
4. Reduce with WinReducer
Install/test on VM, and if ok, install on main machine
1. Install Windows on Virtual Machine
Install VirtualBox/VMWare and create a new virtual hard drive (for VBox, it must be of type .VHD, as that is the Microsoft standard. See section 2.2 for VMWare).
Install Windows 7/8/8.1 to your new virtual hard drive, with your user profile, and install all the apps you use (except AV software and Adobe products) and install all the latest Windows updates.
We will be configuring a customized user profile, i.e. the same profile we use for our main machine.
Once you are done customizing, shutdown the VM.
Note: WinReducer can integrate drivers, however, some drivers cant be integrated (like my audio card drivers, so in that case you need to capture your installation drive and not a VM... In that case, you must install on your physical machine and take a snapshot from there to install.wim (I will write another tutorial for that).
2. Attach VHD to windows
2.1 VirtualBox
We need to fire up the Disk Management tool in Windows 8. Type diskmgmt.msc in the run box (Windows key + R).
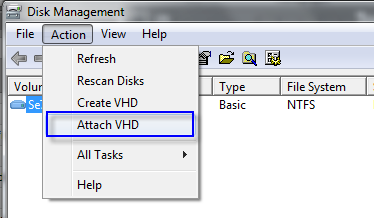
Browse to the .vhd file you created earlier that you installed Windows 8 to. Windows will now attach the vhd file as a new hard drive to Windows Explorer.
2.2 VmWare
VmWare virtual disks cannot be directly mounted in Windows. Instead we need to use other software to mount the virtual disk.
Passmark OSFMount is free software that will allow you to do that.
See more info in this post here.
3. Capture reference image with DISM
Open the command prompt as an Administrator (Windows key + X).
Enter the following command:
In the above command:
X:\Reference.Image is the directory path to where the generated install.wim will be saved
Y:\ is the source drive. We want to capture the entire drive that we added with disk management. This is the bigger of the two drives added. You can ignore the smaller 100MB drive.
We now have an install.wim we can rreduce with.
I then copy the captured install.wim into the folder of my Windows 8 DVD and replace the original install.wim.
4. Reduce with WinReducer
Next fire up WinReducer and do your thing.
Done!!!
So, a little while ago I wrote a step by step Sysprep tutorial on how to customize your installation of Windows and use that as a base for slimming with Winreducer.
I showed you how to use Sysprep and all the steps you would need to do to perform this successfully...
Following a little discussion with inallsorts I decided to find out if it was possible to skip the Sysprep process entirely. And the answer seems to be, YES!!
There are some points to note though:
1. I have not installed this on a physical machine yet (but dont foreesee any issues)
2. If you are deploying to a number of different PC's, then you MUST use Sysprep method
So, if you are like me, and just want to customise Windows for personal use, then this is the guide for you
The purpose of this is that you can reuse the same image over and over again, with all the latest windows updates and your own specific apps installed.
I have no issues with preinstalling Anti-virus if I do not use Sysprep. So its just a conflict with Sysprep
Software you need to download (in order of usage):
1. Virtualisation software such as VirtualBox or VMWare
2. WinReducer for Windows 8/8.1
Here are the main steps that we will perform:
1. Install Windows on Virtual Machine
2. Attach VHD to windows
2.1 VirtualBox
2.2 VmWare
3. Capture image with DISM
4. Reduce with WinReducer
Install/test on VM, and if ok, install on main machine
1. Install Windows on Virtual Machine
Install VirtualBox/VMWare and create a new virtual hard drive (for VBox, it must be of type .VHD, as that is the Microsoft standard. See section 2.2 for VMWare).
Install Windows 7/8/8.1 to your new virtual hard drive, with your user profile, and install all the apps you use (except AV software and Adobe products) and install all the latest Windows updates.
We will be configuring a customized user profile, i.e. the same profile we use for our main machine.
Once you are done customizing, shutdown the VM.
Note: WinReducer can integrate drivers, however, some drivers cant be integrated (like my audio card drivers, so in that case you need to capture your installation drive and not a VM... In that case, you must install on your physical machine and take a snapshot from there to install.wim (I will write another tutorial for that).
2. Attach VHD to windows
2.1 VirtualBox
We need to fire up the Disk Management tool in Windows 8. Type diskmgmt.msc in the run box (Windows key + R).
Browse to the .vhd file you created earlier that you installed Windows 8 to. Windows will now attach the vhd file as a new hard drive to Windows Explorer.
2.2 VmWare
VmWare virtual disks cannot be directly mounted in Windows. Instead we need to use other software to mount the virtual disk.
Passmark OSFMount is free software that will allow you to do that.
See more info in this post here.
3. Capture reference image with DISM
Open the command prompt as an Administrator (Windows key + X).
Enter the following command:
Code:
dism /Capture-Image /Compress:max /ImageFile:X:\Reference.Image\install.wim /CaptureDir:Y:\ /Name:"Windows 8 Pro"In the above command:
X:\Reference.Image is the directory path to where the generated install.wim will be saved
Y:\ is the source drive. We want to capture the entire drive that we added with disk management. This is the bigger of the two drives added. You can ignore the smaller 100MB drive.
We now have an install.wim we can rreduce with.
I then copy the captured install.wim into the folder of my Windows 8 DVD and replace the original install.wim.
4. Reduce with WinReducer
Next fire up WinReducer and do your thing.
Done!!!
